MIX REVIEW: FIELD TEST: DANGEROUS MUSIC MONITOR, MQ, 2-BUS AND MIXER
Dangerous Music is leading the way to a brave new world with a line of professional recording studio interfacing tools that facilitate the highest-quality sound of music recorded and mixed inside any digital audio workstation.
The product line began as a simple quest for better-sounding music mixes made “inside the DAW box” at Dangerous Music’s recording studios, located in the East Village of Manhattan. Chris Muth, designer of the mastering gear for Sterling Sound, set out to design a full line of stand-alone units that would mimic specific functions of high-end analog mixing boards.
DANGEROUS MUSIC PRODUCT LINE
During a month-long album mix project, and the subsequent month’s sessions, I was able to test-drive four Dangerous units in various situations, using both Pro Tools MIXPlus and PT|HD systems. I rackmounted and kept all of the Dangerous gear powered up 24/7, and connected to either an Apogee AD8000 or Digidesign 192 HD I/Os.
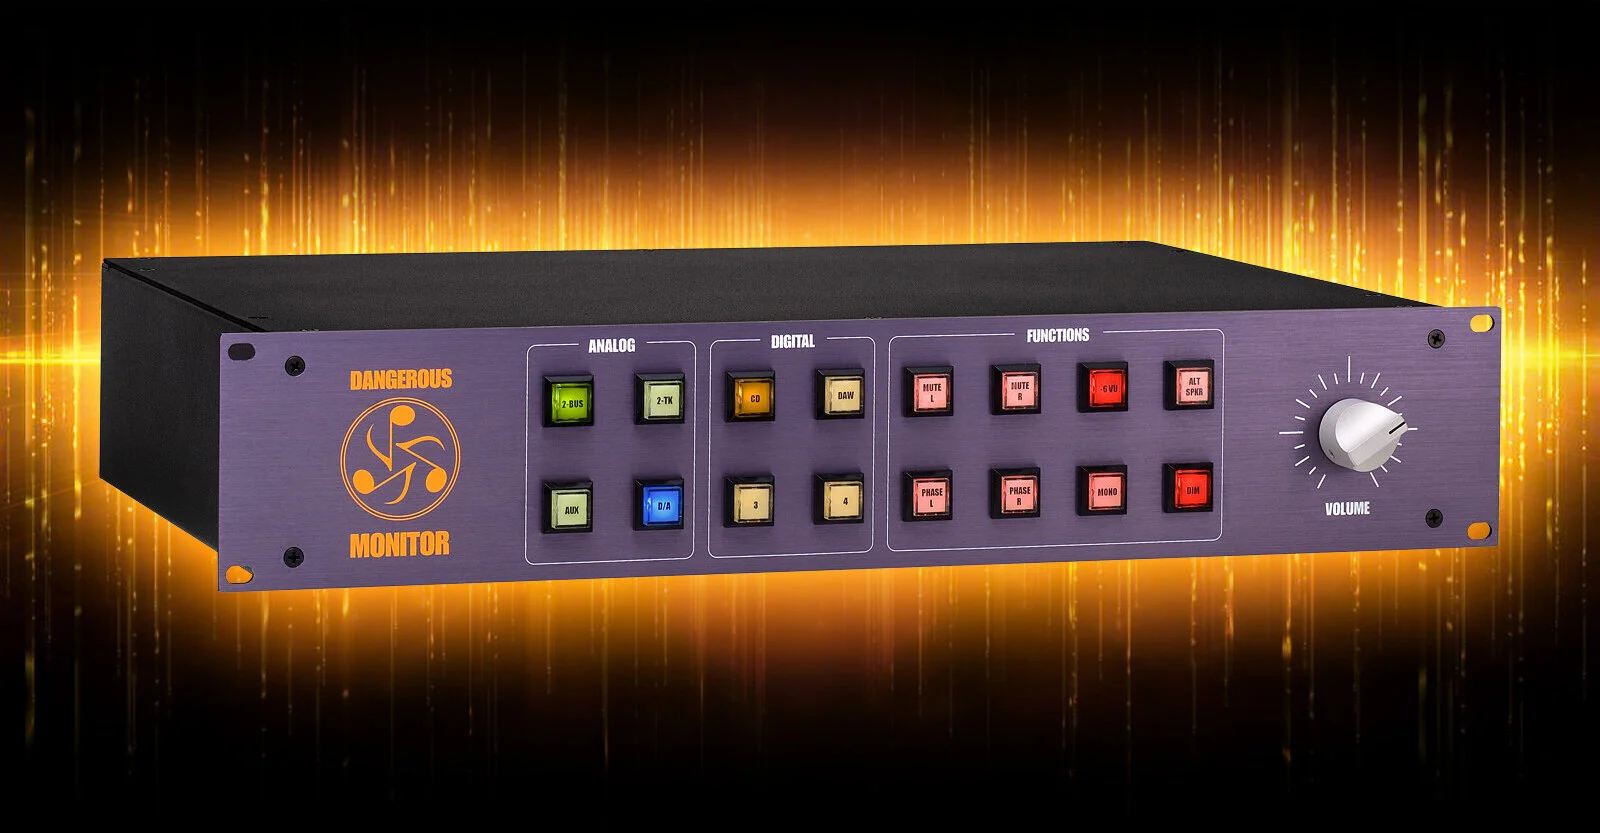
Dangerous currently makes five products: the Dangerous Monitor, an analog and digital source switcher; the MQ, a combination analog/digital metering, talkback and dual-stereo cue system controller; the 2-Bus, an analog stereo stem summing unit with 16 analog inputs (the company also makes the 2-Bus LT, a lower-price version with fewer features); and the Mixer, a stand-alone, 8-channel stereo line mixer.
All of these units (except for the 2-Bus LT, which is one-space) are packaged in steel, two-rackspace cabinets that are fitted with anodized-aluminum front panels and cast-aluminum knobs. Construction features external power supplies, thick PC boards, hole-through, as well as surface-mount components and hand-wiring. I placed the Dangerous stack at my side, about two feet off the floor, right at my mixing position in front of the speakers. If you get all four units, you’ll have four power supplies to connect; Dangerous should come up with a single master power supply to run them all at once.
The internal amplifier circuits in all the Dangerous products use Burr-Brown op amps: BB INA134 and 137 (instrumentation amps), OPA 134 (op amps) and DRV 134 (output drivers). Only relays are used to switch audio in the Dangerous units; hermetically sealed Aromats with silver contacts are used to switch phase (polarity), mute and ground-out unused inputs. All audio resistors are surface-mounted and 0.1% tolerance with low temperature coefficients. Solen capacitors are used in the Mixer and MQ units in critical audio paths that accommodate a wide range of input devices, from D/A outputs to mic pre’s to stomp boxes. The lighted switches are made by EAO with internal multichip LED lights; they’ll never burn out. Audio cable is Mogami OFC, with ribbon cable used only for DC control voltages to the relays.
DANGEROUS MONITOR TOUR
The stepped attenuators used for volume and bus master faders are custom-made by NASA-supplier Janco Corp. There is a shield layer between the two wafers of the switch to further isolate and prevent crosstalk between the left and right channels.
The monitor comes configured to handle +4dBm balanced sources, but there are internal jumpers to reset it for unbalanced operation. Because you can select between seven different stereo audio sources to monitor (three analog and four digital), all rear-panel connections use XLR connectors for both analog and digital (AES/EBU). Each AES/EBU input is buffered and fed through to a male XLR digital-out jack to connect to digital recorders or to your D/A converter(s). The unit comes with an internal, custom Troisi D/A converter that “sees” the selected digital input source and clocks to the incoming sample rate, up to 96 kHz. This common D/A converter resolves level differences and the “different-sounding D/A converter issue” due to sources resulting from DAT, CD or sound card D/A outputs. I found that the converter worked well and sounded fine, although I didn’t spend any time doing an A/B. Indeed, it’s a nice feature, but I feel that it should be offered as an option. Dangerous offers a custom modification to allow substitution of the Troisi board with your favorite external D/A converter.
The back panel finishes out with XLR line-level output connectors for both small speakers and main monitors. For monitoring, I connected a pair of powered Genelec 1031As and a Bryston 3B power amp to drive a pair of NS-10Ms for small monitors. Finally, there is a special 6-pin analog VU meter output jack and digital meter output jack that connect to the MQ unit. The meter outputs follow whatever source you have selected.
On the front panel, Monitor has the smoothest master volume control; it’s actually a 21-step attenuator for recallable volume-level control. I liked the large aluminum knob and knowing that this control will never get scratchy. Unlike a volume potentiometer, an attenuator ensures that the sound quality remains constant: The left and right imaging doesn’t shift with different volume settings. There’s loads of gain here, and I like being able to return to the exact same volume easily. I just counted clicks or used the panel markings.
Other features on Monitor are represented by well-lighted, large-sized buttons, including a monitor speaker Dim button with an internally adjustable level control that also activates when the MQ’s Talkback button is pushed; an alternate speaker switch; a very handy L+R Mono check switch; individual L/R mutes and 180∞ polarity flip buttons for both left and right channels; and a -6dB offset meter scaling switch that saves the MQ’s VU meters when monitoring at hot levels. This feature came in handy when monitoring playbacks from my Alesis MasterLink’s hot analog output. I also like using the L/R polarity flip buttons with mono summing to check the side or difference component of my stereo mixes.
THE “MUST-HAVE” MQ
Using the Monitor was completely transparent to my mixing process. The source buttons work without effort and without clicks, the volume control is easy to grab and precisely set, and, like the whole Dangerous line, the unit has a solid and rugged feel. I wasn’t hurting anything even with my usual rough treatment during the heat of a session.
The natural companion piece for the Monitor, the MQ has two large Sifam R-22 lighted analog VU meters and a high-resolution (32kHz to 96kHz) LED ladder digital meter made by Prime LED. The digital meter has a three-successive-word-over indicator and a Peak Hold button. Both of these meters get their signals from Monitor via the included cables. I tried connecting the digital meter to the AES/EBU digital output of my MasterLink and the digital out of the Apogee and all worked fine.
There are master level controls for the A and B stereo cue systems and each come with their own power amps. I used my 55-ohm AKG K 271 headphones in one of the two front-panel jacks and had more than enough volume. The manual explains that each amp will drive down to 4-ohm total load impedances, equal to about eight pairs of medium-impedance phones like the Sony MDR line, for a total of 16 headphones. The cue output XLR connector is ready for any standard headphone box, like Redco’s Little Red Cue Box or a Simon Systems box.
The MQ has complete talkback facilities with a shock-mounted microphone and TB button on an included 12-foot “producer leash” (cable); the TB jack will let you connect a Brainstorm wireless remote, if you prefer. TB worked well: It dimmed the monitor speakers, provided good audio and added no button clunks or pops. There should also be a front-panel TB button for the engineer.
2-BUS INSIDE AND OUT
Other features include a Dim command jack to remotely dim the loudspeakers; a Slate out jack for routing the talkback mic’s audio to a separately recorded track and/or to a powered speaker to talk to the orchestra conductor’s podium or live room; and two auxiliary mono inputs with pan pots assignable to either cue A or B for injecting external audio feeds such as production soundtracks when doing ADR, metronome click tracks for drummers or “two pops” for the conductor when leading a live scoring session. The MQ is a necessity for professional engineers to fully control and monitor a DAW recording or mixing session. A unit like the MQ will separate your system from the typical home studio rig.
2-Bus is a 16×2 summing amplifier where high-quality analog circuits sum to a stereo bus from the analog outputs of your DAW’s I/O unit. Digital mixing and summing inside your DAW to stereo outputs require that you do not overload the internal digital mixing bus by lowering all mixer faders. When any track fader’s level is internally reduced, its digital resolution is also reduced. Spreading out a mix over many stems and direct outputs lets you maintain hotter digital levels for higher resolution, resulting in a better-sounding mix with increased depth, image width and headroom, and less distortion.
Having mixed a lot of music inside of DAWs and also using separate outputs into a large analog console, I prefer the sound of my mixes done on the console. I find the same mix, when summed in analog (on the console) rather than digitally (inside a DAW) was bigger-sounding, clearer and much more “alive,” one reason why many record producers and engineers (for the most part and with budgets permitting) still prefer mixing songs recorded in DAWs on large analog consoles.
With the Dangerous gear, you can keep using your “inside-the-box” mixing process (I love using Pro Tools’ automation and all of the plug-ins) and gain the advantages of analog summing.
All eight stereo stem inputs of 2-Bus are fixed gain. There are no track faders on the unit, as you’ll want to make level changes in your DAW’s automated mixer. Additional 2-Bus units (as well as 2-Bus LT units and mixers) can be linked by way of a 25-pin D-connector expansion port, where the stereo summing bus of each additional 2-Bus are joined together for as many inputs as you’d like. (For each 2-Bus added, there will be a 3dB increase in the noise floor.) Because the 2-Bus is a simple summing amp without the additional circuitry found in a big analog console (such as pan pots, mute buttons, buses, faders or auxiliary sends that can add noise and degrade the signal), the sonics and specifications are better.
Hook up is simple: Just connect a standard XLR mic cable from each balanced output of any 8-channel D/A converter — like Apogee’s AD8000, Prism Dream ADA-8, Nuendo 8-I/O 96k, Digidesign’s 888 or the 16-channel 192 I/O — to the 2-Bus’ 16 balanced XLR input connectors. There is an extensive tutorial in the manual about unbalanced setup and operation of the 2-Bus if needed. The 2-Bus will accept hot levels with an input clip point at +26 dBu.
The 2-Bus has two sets of balanced outputs: main for connection to your stereo master analog or digital recorder and/or A/D converter, and Mon to connect to the Monitor. The stereo master output fader is actually a trim control and has a range of 10 dB in 0.5dB steps, with the straight-up 12 o’clock position as the optimal operating point. Using precision and temperature-compensated resistors, this control is left/right-matched to within hundredths of a dB. But this is not an appropriate fader to use for “board fades.” You’ll have to do those inside of your DAW by grouping all stem submasters together.
2-BUS IN ACTION
2-Bus’ front-panel controls are few and simple. The eight +6dB boost switches jump the analog level of any stereo stem input up to 6 dB. If you need to do this, as I did for each mix, it’s sonically better to boost using good analog amplifiers than opting to do it digitally inside your DAW. Each stereo pair input has a Mono button for summing the left and right channels to mono. Any tracks you desire in the center of your mix are routed (inside your DAW) to direct outputs. Direct outs sound better and save DSP resources, bypassing pan pots and additional digital mixer nodes. When you push Mono on one of the eight stereo pairs of the 2-Bus, the two mono sources routed to that pair are sent straight up the middle of the stereo field.
Applications of the 2-Bus might include using the Mono button feature for kick, snare, bass and lead vocal tracks that you want in the center of your mix. You would route them each to separate DAW direct outputs: 1, 2, 3 and 4, respectively. The rest of your tracks could be mixed to stereo stems like this: Use outputs 5/6 for keyboards, 7/8 for backing vocals, 9/10 for guitars, 11/12 for drums, 13/14 for remaining percussion and 15/16 for stereo effect returns. Push the Mono button on the first two stereo pairs and the kick/snare will come in on 1/2 and bass/lead vocal 3/4 because you want them in the center of the mix.
I would say my only adjustment to using this system is the process of stem mixing itself, but once basic levels are set, it’s the same as mixing down a stereo pair inside Pro Tools except you’ll have more headroom and dynamic range, a wider stereo spread and clearer sound — just like I find when mixing PT track outputs on an analog desk. And just like on an analog board, I found myself having to work a little harder on plug-in settings, effects, mix moves and minutia because of the increased clarity and transparency.
If you like mixing separate outputs of your DAW on a large analog mixing console, but owning one or paying for studio time is out of the question, the 2-Bus with its minimal signal path electronics accomplishes the same summing process.
I followed this example exactly and set up an A/B comparison between the Dangerous units and a large ’70s vintage API console. I carefully matched levels (using an oscillator) coming from a Pro Tools|HD system so that the console’s fader levels (the PT outputs were already normaled to the board) were all electrically equal on the board’s mix meters even though their actual fader positions were not. The same set of outputs was also routed to the 2-Bus. I toggled the same Genelec 1031A monitors back and forth between the monitor output section of the board and the Mon jacks of the Dangerous Monitor. After matching volume, the mix out of the Dangerous rig and the API ended up essentially sounding the same. A very subtle difference does exist: The Dangerous 2-Bus produces a slightly cleaner sound in the bottom end with a more open top end.
MIXER
My only request would be to add an insert path and an in/out switch in the master fader section to use a stereo compressor and/or EQ. But like analog processing of the individual stereo stems, this could easily be done by connecting your outboard gear externally in front of 2-Bus’ inputs and/or the output sockets by way of a patchbay.
ANALOG ANSWER
Mixer is a simple 8×2 companion line mixer to the 2-Bus, but with level fader knobs, pan pots, lighted phase flip and mute buttons. With eight XLR mono inputs, Mixer has the same expansion port as 2-Bus, used to enable stacking other Mixer units for even more inputs. You can also connect it to the expansion input of the 2-Bus for eight more mono inputs to your final mix. Mixer will run stand-alone for any number of applications, from mixing the outputs of many vintage mic pre’s you have on a drum kit to a cue mixer or for external effect returns. One very good use is for summing MIDI keyboards running in virtual mode into the mix. You can set an internal jumper for unbalanced operation to match synth outputs. Like 2-Bus and Monitor, Mixer has the same high-quality stepped attenuator for the stereo output bus level.
Dangerous Music makes elegant, easy-to-use systems for analog bus summing, mixing, metering and monitoring of any DAW system. These units are of high build-quality and offer superb sound, are strictly professional and are built to mastering studio standards to maximize the sound of your DAW. Prices: Monitor, $4,999; 2-Bus, $2,999; 2-Bus LT, $1,499; MQ, $2,999; and Mixer, $2,599.
Read the original review here:
http://mixonline.com/products/review/audio_dangerous_music_monitor/


